Brick tolerances are the tiny manufacturing variances that decide whether two pieces snap together with confidence or wobble apart. The features that matter most, stud diameter, tube diameter, and stud height, are commonly held to about ±0.01 to 0.02 mm on well-controlled molds, with roughly 0.1 to 0.2 mm of intentional global play built into every brick. Before you buy any compatible set, check whether the seller documents tolerance specs or QC reporting. If they can’t show you that paperwork, treat the clutch fit as a gamble.
TL;DR:
- Tighter control of stud OD, tube ID, and stud height within ±0.01 to 0.02 mm is essential for a consistent clutch fit, especially on compatible bricks.
- Most production bricks are intentionally designed to measure approximately 0.1 mm smaller than conceptual sizes to allow for reliable interlocking and easy assembly.
- Sellers should provide documented tolerance reports, CMM data, or third-party lab testing results; lack of such documentation hints at less reliable quality control.
- 3D printing compatible bricks requires precise calibration, aiming for a stud OD of 4.75 to 4.85 mm and an inner tube ID of 4.90 to 5.00 mm, with adjustments based on test fits.
- Large-scale builds can suffer from tolerance stack-up, meaning small errors in individual bricks accumulate, causing misalignment or warping in bigger models.
Table of Contents
- Understanding Brick Tolerances: The Grid Behind Every Set
- Which Measurements Actually Control Clutch Fit
- Manufacturing Choices and QC Signs Buyers Can Actually See
- Calibrating 3D-Printed Bricks for a Usable Clutch Fit
- Why Tolerance Stack-Up Matters on Large Builds
- How Affordable Bricks Verifies Fit Before You Ever Open the Box
- Why Marketing Claims Matter Less Than a Tolerance Sheet
- Ready to Test the Fit for Yourself?
- Sources
- FAQ
Understanding Brick Tolerances: The Grid Behind Every Set
Every compatible brick starts life as a set of conceptual numbers on a designer’s screen, not the plastic dimensions you actually measure with calipers. The standard grid runs on an 8.0 mm horizontal pitch and a 9.6 mm vertical pitch per brick layer. A conceptual 2×4 brick works out to 16 mm by 32 mm by 9.6 mm on paper, clean multiples that make the whole system stackable in any direction.
Production parts never match those numbers exactly, and that’s by design. A real 2×4 brick typically measures closer to 31.8 by 15.8 by 9.6 mm once it comes out of the mold, according to measured dimension studies of production parts. That 0.1 mm per side shrinkage isn’t a defect. It’s deliberate play that keeps two bricks from binding when you push them together, and it’s what lets a ten-year-old set still snap onto a brand-new one.
This split matters for how you think about compatible sets:
- Conceptual dimensions exist for layout and design software, where clean multiples of 8.0 mm and 9.6 mm make planning simple.
- Production dimensions exist for the actual mold, where a fraction of a millimeter of play prevents jamming.
- The gap between them is not sloppiness. It’s the engineering margin that makes an entire building system interchangeable across manufacturers and decades.
Once you understand that gap exists on purpose, the next question becomes which specific measurements a manufacturer actually needs to control tightly, and which ones have room to drift.
Which Measurements Actually Control Clutch Fit
Three dimensions do almost all the work: stud outer diameter (the bump on top of a brick), tube inner diameter (the hollow cylinder underneath), and stud height. Push a stud into a tube and the tiny bit of interference between those two diameters creates the friction that holds your build together. Get any one of them off by too much, and you feel it immediately, either a stud that slides in with zero resistance or one that requires real force and risks cracking the tube.
Factories with tight process control target roughly ±0.01 mm on these critical features. Compatible-brick manufacturers that can’t hit that level often work to a slightly looser but still workable benchmark, which is generally accepted across the industry as the point where clutch still feels consistent. Once specs drift beyond that, into ±0.05 mm or looser, you start noticing real problems: loose studs that pop apart during a build, or tight ones that make disassembly a fight.
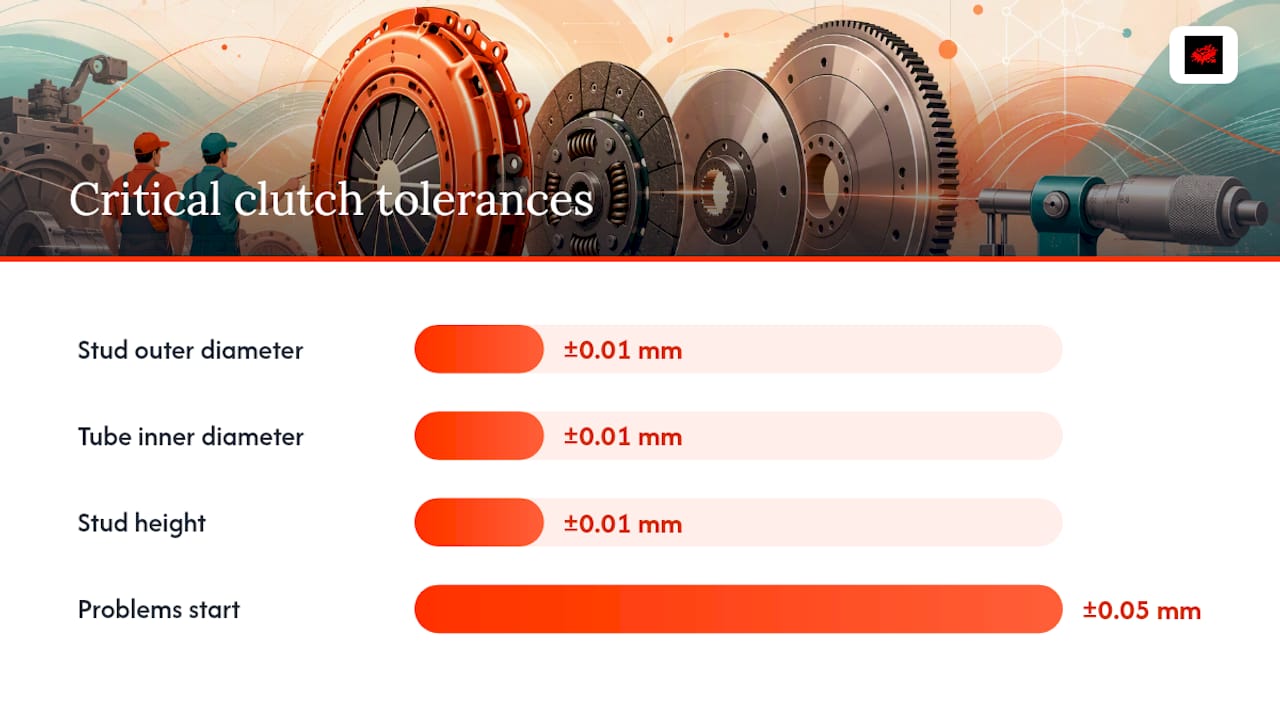
Statistic Callout: A stud-to-tube interference of just a few hundredths of a millimeter is the entire mechanism behind clutch power. Diameter differences smaller than the thickness of a sheet of paper separate a “perfect” fit from a frustrating one.
What makes this tricky is that clutch force isn’t controlled by one dimension in isolation:
- Stud OD and tube ID work together. If both drift in the same direction, the interference stays roughly constant.
- Stud height affects how much surface area is actually gripping inside the tube.
- Material stiffness changes how forgiving a given tolerance range feels in practice, which is exactly why the plastic itself deserves its own look.
Manufacturing Choices and QC Signs Buyers Can Actually See
Material choice is where tight tolerances become possible or impossible. ABS plastic shrinks predictably and repeatably as it cools in the mold, which is why it became the standard for interlocking bricks decades ago. PLA and PETG, common in 3D printing, shrink less predictably and vary more between batches. ASA holds up better outdoors but behaves similarly to ABS in the mold. A manufacturer that controls shrinkage batch after batch is the one whose bricks will still fit your older sets five years from now.
Several process signals separate a well-run factory from a corner-cutting one:
- Wire EDM-machined mold cavities. This produces the sharp, precise stud and tube geometry that ordinary machining can’t match.
- Scientific molding and process monitoring. Consistent injection pressure and cooling across millions of shots matters as much as the mold’s initial precision.
- CMM sampling. Coordinate measuring machines check parts against spec on a regular schedule, not just at launch.
- Third-party lab testing. Standards like ASTM F963 and EN71 confirm both safety and dimensional consistency for toys sold at scale.
You can spot warning signs without a lab. Look closely at product photos for visible knit lines, the faint seams where plastic flow fronts meet inside the mold. Some knit line is normal, but prominent or poorly placed ones point to weak mold design. Watch for parting-line flash, uneven color between pieces from the same set, and photography that only shows finished builds from a flattering distance.
Pro Tip: Before you buy, ask the seller for a one-page tolerance or CMM report and a close-up photo of the stud-to-tube interface. A seller with real process control will have that documentation ready. One that stalls or deflects the question is telling you something.
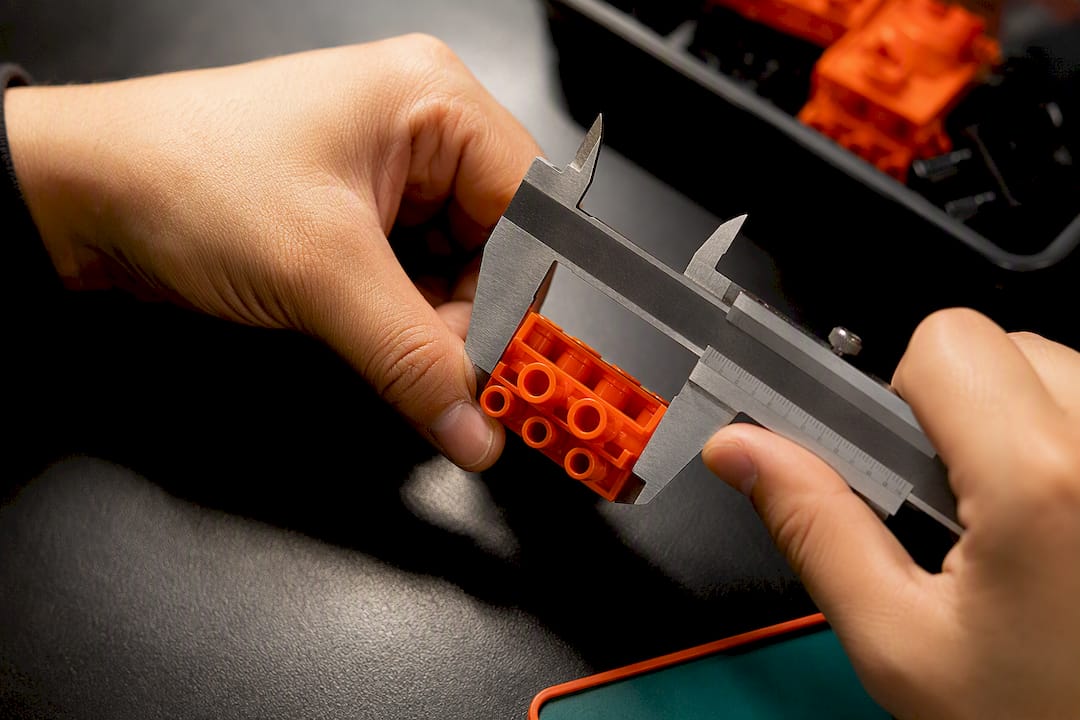
Calibrating 3D-Printed Bricks for a Usable Clutch Fit
Injection molding routinely holds tolerances near ±0.01 to 0.02 mm. A typical FDM 3D printer, straight out of the box with no calibration, lands closer to ±0.1 to 0.2 mm, which is loose enough to ruin clutch fit entirely. If you’re printing your own compatible parts, calibration isn’t optional. It’s the difference between a brick that works and one that either falls apart or has to be forced together.
Here’s a calibration sequence that gets you close:
- Run a flow-rate single-wall test to confirm your printer extrudes the exact wall thickness you tell it to.
- Measure and apply horizontal expansion offsets in your slicer, since most printers oversize outer walls by a small but consistent amount.
- Compensate hole diameters separately from outer walls, since round holes print smaller than programmed almost universally.
- Adjust wall count and layer height for the specific stud and tube geometry you’re printing, since thin walls flex differently than thick ones.
- Note material-specific shrinkage. PETG and ABS behave differently from PLA even on the same printer with identical settings.
Aim for a stud OD around 4.75 to 4.85 mm and an anti-stud (tube) ID around 4.90 to 5.00 mm as your starting target window. Print a small test batch, check the fit against a known-good brick, and adjust in 0.02 mm increments until the clutch feels right, not too loose, not requiring force.
Why Tolerance Stack-Up Matters on Large Builds
A single stud with 0.02 mm of error is invisible. Forty studs in a row, each drifting the same direction, adds up to nearly a millimeter of misalignment across a long wall or a wide baseplate. That’s tolerance stack-up, and it’s the reason a beautiful small model can turn into a warped mess when you scale the same design up tenfold.
A few design habits keep stack-up from becoming a real problem:
- Use plates instead of stacked bricks anywhere flatness matters, since plates carry less cumulative height error.
- Add structural ribs or internal reinforcement on spans wider than a couple dozen studs.
- Dimension large sections conservatively rather than assuming every brick hits its exact nominal size.
- Accept small, cosmetic gaps on non-structural surfaces rather than redesigning an entire section chasing perfection you won’t actually see.
Statistical approaches that treat variation as an average plus a spread, rather than worst-case arithmetic, tend to produce builds that hold together without being over-engineered.
How Affordable Bricks Verifies Fit Before You Ever Open the Box
A seller launched recently and serves customers seeking premium compatible sets without collectible-market markups. Fit isn’t an afterthought here. The sets typically include detailed building instructions and promise that pieces fit together as expected based on the packaging.
Three sets in the current lineup show exactly what careful tolerance control looks like in practice:
- Lord Helmet 75304 tests small, high-precision studs where even a hair of extra clearance shows up as wobble in a display piece.
- Red Supercar 4020 stresses panel alignment across curved body sections, a real test of consistent shrinkage.
- Retro Muscle Car 10304 relies on long structural runs where stack-up would show immediately if tolerances drifted.
Before you commit to a full collection from any compatible-brick seller, start with one smaller set, check the product photos closely for the QC signs covered above, and see how the clutch feels in hand.
Why Marketing Claims Matter Less Than a Tolerance Sheet
Every compatible-brick seller claims quality. Almost none of them show their work. The real difference between a set that builds smoothly and one that fights you the whole way through isn’t the price tag, it’s whether the manufacturer actually controls stud OD, tube ID, and stud height to a documented spec, shot after shot.
A tight clutch fit feels obvious once you’ve handled it: pieces seat with a confident click and hold their position without forcing. A loose one feels obvious too, in the worst way, with studs that slip free mid-build. Chasing the lowest price without asking about process control is how buyers end up with the second experience.
If there’s one habit worth building as a compatible-set buyer, it’s this: ask for the tolerance report before you ask for a discount code.
— Affordable Bricks Editor
Ready to Test the Fit for Yourself?
This company offers premium, hard-to-find compatible sets without the collector markup, backed by detailed instructions and attention to clutch fit detail. That’s the practical alternative to gambling on unnamed sellers who won’t show you a tolerance sheet or a close-up of their molding quality.

Start small if you want proof before you commit to a bigger collection. The Lord Helmet 75304 and Retro Muscle Car 10304 both showcase the kind of panel alignment and stud consistency this whole article has been about, and the Red Supercar 4020 is a solid test case if vehicles are your thing. Browse the full vehicle collection or the complete storefront to compare options, and don’t forget to check for the veteran and first responder discount at checkout. Order one set, test the fit yourself, and judge the tolerance claims with your own hands.
Sources
- Lego dimensions — General considerations (measurement study)
- Best tolerances for 3D printing LEGO-compatible bricks - Meshy
- Minimizing knit lines — Protolabs design tips
FAQ
What Are Brick Tolerances Exactly?
Brick tolerances are the allowed dimensional variation in stud diameter, tube diameter, and stud height that determines how tightly two bricks clutch together. Tight control, generally ±0.01 to 0.02 mm on critical features, produces consistent, confident fit across an entire set.
Why Do Production Bricks Measure Smaller Than Their Conceptual Size?
Manufacturers build in roughly 0.1 mm of play per side so bricks don’t jam when pressed together, which is why a conceptual 32×16 mm brick measures closer to 31.8×15.8 mm once molded. That gap is intentional engineering, not an error.
How Can I Tell If a Compatible Set Has Good Tolerances Before Buying?
Look for sellers that disclose tolerance specs, CMM sampling, or third-party lab testing, and examine close-up product photos for knit lines, flash, or uneven color. Affordable Bricks builds its sets around documented fit and detailed instructions, so checking a seller’s product notes before ordering is always a smart first step.
What Tolerance Should I Target When 3D Printing My Own Bricks?
Aim for a stud outer diameter around 4.75 to 4.85 mm and a tube inner diameter around 4.90 to 5.00 mm, then fine-tune with a flow-rate test and horizontal expansion offsets. Most FDM printers need this calibration since out-of-the-box accuracy runs looser than injection molding.
Does Affordable Bricks Offer Discounts?
Yes, Affordable Bricks offers discounts for military personnel and first responders at checkout. Current pricing for individual sets is listed directly on each product page on the Affordable Bricks storefront.